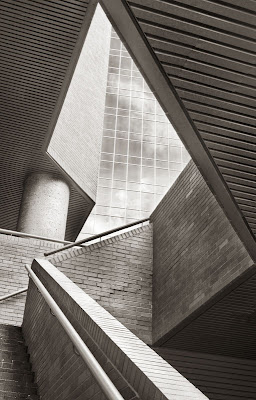
I was asked about how I took and processed this image, so here goes.
To start, we see a set of stairs. But we know that wide angle lenses aimed up cause converging verticals and can make for some interesting shapes. I could see that the brick had both texture and sufficient reflective properties to shine a little in some places (eg. the top of the banister).
If you followed the blog you know I first shot it hand held, ei. 400 with the 40D and 18-55, and after seeing the crop that Chuck recommended, came up with my own crop based on keeping the point on the right by cloning out the distracting light fitting.
Back the next day with my 1Ds2 and more importantly, with a tripod, I was able to shoot multiple exposures to contain the huge dynamic range from reflected sky in the glass to darkest recesses of the stair well.
I found that I could capture this in two images, one for the dark areas, using Recovery in Camera Raw to keep the banister from blowing out (the brightest bricks in the image. I used the second exposure for the windows and reflected clouds. I did some individual colour adjustment (page 3 of Camera Raw) to darken the blue sky and increase saturation of the blue a little.
Once in Photoshop, I copied the sky exposure on top of the bricks exposure and using a black mask, I painted into it so the windows and sky and clouds would show up. At this point they were rather anaemic despite the camera raw adjustments. Once I had the exposures suitably blended I flattened the image and sharpened.
I converted the result to black and white using Photoshop CS3's black and white adjustment layer, lightening the bricks via the yellow and red sliders and darkening the blue via that slider.
I now had a black and white image in which the clouds were quite easily seen. There was too much light on some of the banister, not enough on other parts and it was necessary to use a couple of curves adjustment layers black masked and painted into to even things out.
I used a couple more curves to darken the sky while leaving the clouds light. Some additional work was done on the ceilings via more curves adjustment layers.
Once I had the image more or less where I wanted, I used Akvis Enhancer on a copy layer but then faded the enhancement back to about 25% effect. The image was again flattened.
Some final touch up was done on a copy of the image in a second layer with the dodge highlights (set at 5% opacity brush) and I was able to pop the clouds out even better.


3 comments:
That's very nice, George. Good explanation as well.
Since you used two exposures I'm curious to know why you didn't try Photoshop's 'Merge HDR'?
Good question from Laurie. It's my experience that HDR and auto blending techniques works well when an image has a full range of tones. It works less well when much of the image is low contrast and one particular part is dramatically brighter than the rest. The end result is that you reduce the contrast so much in the main part of the image it looks horrible, just so you can record any detail in the bright part.
Often photographer will use various local contrast enhancers to undo some of this effect but I have found that I have to do so much work after to correct the contrast that it's easier my way.
Had the bright area been much more complicated I might well have gone for the HDR tone mapping route. Remember that too much local contrast enhancement starts to look artificial.
George
Post a Comment