Sunday, August 28, 2011

More On Stone


As usual, you can click on the image to see it larger. Worth it here as you can see the detail in the stone. Image toned with beige first then purple, and the percentages turned way down for a selenium look.

Lighting Is Everything


The above is a rock cut for highway expansion. The bluish gray shale was in afternoon sun and a this angle - was glowing. Other than a focus blend (poorly done, I needed at least one more image and a mid section is out of focus, damn it) the image has had NO manipulation at all. This looks just like the raw file.

The wind was blowing fairly hard and I could see on the magnified live view that the camera continued to shake, even when using my hat to block the wind. That's it for centre posts. I'll carry it in the car, but not use it. I did find that taking the lens hood off the 70-200 reduced shake to some degree. Next time I'll use an umbrella to block the wind.

Saturday, August 27, 2011

Hornby Island


From a few years ago, two images for stitching, neither on its own looking very good and therefore overlooked, but when combined...

Sunday, August 21, 2011

Glenbow Ranch


Signed up for a photographic excursion into the newly opened Glenbow Ranch Provincial Park. Located between Calgary (pop. 1 million) and Cochrane (30,000?) on the Bow River, eventually the park will connect the two. it's 32,000 acres of hills, meadows, prairie grassland and working cattle ranch


Saturday, August 13, 2011

Timing Is Everything


I'm driving home from Edmonton and as I drive past the grain terminal, I think to myself I must see if I can photograph it before they start knocking it down this winter - well, a second glance and I see I have NO time to get over there before they start...


Monday, July 25, 2011

The Beginning Of A New Project?


This rather nice image is simply a plastic grocery bag, lit from above and behind with a couple of 4 foot fluorescents, right behind my computer. There might be something here.

Sunday, July 17, 2011

Canvas Printing

It had been my intention to clean the jets of my old 7600 and load it with some Breathing Color canvas - but clogged jets and issues around stretching, framing and coating the prints, and I concluded that it might just be easier to order them online.

So, I checked out some companies. One seemed very reasonable and offered free shipping - but I noted that they didn't talk colour space or icc profiles and I wondered if this might not be what I was looking for. A few more attempts and I came across Canada On Canvas. They seemed to suit so I processed a file (the cover image from my first book - broken window, and uploaded to their ftp site after appropriate sharpening and converting to Adobe RGB.

Within the week came back a 20X30 canvas print, mirror edges (which they did) on 1 3/8 wood framing. It looked so good my office staff wouldn't let me bring it home and it has engendered a number of very favourable comments.

I happened to owe my sister a print, and wanted a couple of prints for my father, and I was behind in a Christmas present for a friend, so since the first print looked so good, I quickly arranged 3 more canvas prints. Two of the three I have seen and I'm delighted with the results - spot on colour (the joys of a profiled monitor, and at their end good profiles for printing).

Sure I'm losing some profit by not doing my own framing and stretching - frankly - they are welcome to it. I don't even have to leave home. Compared to getting prints done locally, the results are far superior - and I have cancelled any plans for replacing my 7600 with a newer and bigger printer - I just don't see the point.

Now I want some canvas prints for myself. I'd had considerable reservations about printing on canvas - texture, detail, etc. but so far I'm delighted. That the prints are light compared to a glass/matte/frame job on regular paper, not to mention a fraction of the price, and darn, they look nice on the wall. I did get frames for my Dad, thinking he might not appreciate the modern look of unframed canvas with mirrored edges, but the consensus in our office is we sure don't miss those frames and glass that hides the image.

Whether the prints will stand up to time remains to be seen. I am a bit concerned that Canada On Canvas uses a vinyl product for protecting the prints. Sure can't see or smell it which suggests to me that it isn't loaded with damaging and eventually leaving plasticizers. The product they use is well known for protecting canvas prints. If they last 30 years, I'll be well pleased.

George

Ressurecting An Oldie (but Goody?)


Came across this old image and decided to play with it. Some 30 layers later, each masked and painted, and some careful cloning in a small area, and I'm quite pleased with the result.

In total this adds several hundred subtle changes to colour, tone, or contrast in one area or another, this on top of all the changes I made last time round. Despite this, the final image is very close to the original scene that attracted me.

Sunday, July 10, 2011

Walkabout


Certainly different from my usual subject/style/equipment - shot with my new Fuji X100 as Ken and I wandered around downtown Calgary no a Sunday morning. A bit lucky with the placement of the young woman, but none the less indicating the camera is fairly responsive. Decent dynamic range too, from sunlit cloud to shaded alleyway.

Saturday, June 25, 2011

Casual Shooting


Picked up a Fuji X100 this afternoon and with the small amount of charge in the lithium battery, was able to head out and take a few snaps. Discovered this snow plow round a corner and out of sight. Had fun playing the angles, trying the EVF vs. Optical viewfinder.

Quickly found the evf quite dark, though useable, the Optical finder very nice. At 10X15 image size on print, it's tack sharp, f 11, 1/35 second, EI. 400. Later in the day I found out how to use the auto ISO - very nice - you can specify max. iso and min. shutter speed - prob. should have shot this at 1/60 to be safe and ei. 800 - but I got away with it.

As I played round the plough, I did think I missed my wide angle zoom - I actually had to move in and back to get the right framing - how inconvenient was that. Perhaps the image would have been even more dramatic with a wider lens - but a) I didn't have one with me, and b) the only reason I went shooting was because it didn't take a lot of time and effort. I do think I move around more hand holding - it's so much easier to try low and high angles - not that I don't adjust my tripod height - I always do - but perhaps not as much when you have to stop, and adjust three legs, then get back to the right position again, and make sure the legs aren't on something soft, unstable or perilous.

What I was thinking as I shot was how much better this would have been with a steady platform - but what I have to get into my head is 'the shot you get is ALWAYS better than the shot you didn't take'.

Don't know why they didn't provide the camera with an ISO dial - that really would have been the cream on the cake - but for hand holding, I think I'll take advantage of Auto ISO, setting the f stop and letting the shutter speed go where it will, with exposure compensation as needed (that is a dial on top).

What I'm less certain of is how much I'll like a fixed 35 mm. lens, but I got the camera with the idea of eliminating too many choices, and I'll let you know how it works out.

Sunday, June 19, 2011

Up Close And Out Of Focus (mostly)

So, why is it that there is so little depth of field when photographing portraits when photographing mountains and nearby fences is relatively easier?

The formula for Depth of field (at least one of them anyway) is:
\mathrm {DOF} \approx \frac {2 N c f^2 s^2} {f^4 - N^2 c^2 s^2} \,.
where N if the f number, f is the focal length, c is the circle of confusion and s is the distance the camera is focused. Note that in the formula, depth of field varies as the square of the subject distance. That means that if we have 2 feet in front of the subject distance of 10 feet, we'd not have one foot if we were shooting at five feet, we'd have six inches, one quarter - so moving in close hugely affects depth of field. Changing focal length of lenses complicates things, but this explains the typical depth of field scale on an old fashioned prime lens - with almost no useable depth at near focus, and fairly decent depth at the longer distances.

The formula came from Wikipedia

Friday, June 10, 2011

Wednesday, June 08, 2011

Thursday, May 26, 2011

Further On The Value Of Projects

Another advantage of doing projects is that we tend to get better with time. Not only was Pepper # 30 Edward Weston's thirtieth attempt at a pepper, he'd also been working with a variety of other vegetables and shells. Although his other vegetable images do get included in shows and books, it is the single wonderful image that many consider one of the greatest photographs ever. So it would appear that even though this was part of a project, it's ok to come out the other end with a single iconic image.

Given a choice between being known for 20 mediocre images vs. one great one, I think most of us would vote for the one great one, in the hope that having made one, it wasn't a fluke and we can do it again, eventually.

Sunday, May 22, 2011

Depth Of Field

Wayne asks for further clarification about depth of field and comments on lenses for APS-C cameras and so on.

Right. Some basic facts.

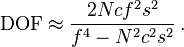
1) depth of field is proportional to the f stop - an opening half as large doubles the f stop (2 stops) and doubles the depth of field.
2) image magnification is invesely proportional to depth of field - make a print twice as big (in linear dimension) and you have half the depth of field. Start with a smaller sensor and you have to magnify the image more, so less depth of field there too.
3) depth of field is inversely proportional to the SQUARE of the focal length. Double the focal length and you get one quarter the depth of field - ouch.

And believe it or not - that's it, no other factors play a big role in measuring depth of field.

So, in Wayne's example of a 35 mm. lens on a DX sensor Nikon and comparing it to 35 mm. film camera (or a full size sensor camera), you have a sensor 1.5X smaller. The actual focal length is 35 mm., whether designed for a dx camera (APS-C size sensor) or full frame.


Wayne notices that a 35 mm. lens on his film camera seems to have more depth of field than when he has a 35 mm. lens on his Nikon APS-C sensor camera. He's right and here's why.

We have three factors, two of which didn't change - focal length stays 35 mm., and f stop remains, say f 11. All that changes is which camera the lens is on (or which 35 mm. lens you are using, but that's the same thing).

Put the 35 mm. lens on a larger format camera (bigger sensor or bigger film) and you don't have to magnify the image as much to make the same size print - so more depth of field. It has nothing to do with angle of view. It has nothing to do with some magic lens design for DX size cameras. It applies regardless of what 35 mm. lens you use.

Now, if you did want the same angle of view, you'd need to use a wider lens on the small sensor camera, so you would be changing the focal length. Here you would still have the magification issue, but you'd have the square of the change in focal length - essentially 1.5 squared and divided by 1.5 - that is, the lens you'd need for the DX sensor camera, would be (35 divided by 1.5) mm. long - approximately 21 mm. The depth of field would be approximately 1.5 times better with this lens on this camera when compared to the same view, same print size on the full frame camera.

This explains why it is so difficult to get shallow depth of field with a point and shoot camera with a sensor one quarter the diameter of 33 mm. film.

What does twice as much depth of field mean - well a simple way to look at it would be sharpness from infinity to 4 feet instead of infinity to 8 feet, or a range of sharpness of approximately a foot behind and in front of the subject instead of 6 inches.

Tuesday, May 17, 2011

Blending Focus

Pete asks why I felt the need to use blended focus, and Helicon Focus specifically, to process the recently posted image (More From Stanley Park).

Several factors come into play.

1) I'm using a full size sensor camera (5Dii) and the larger the sensor the less the depth of field. It's possible that a small point and shoot with it's tiny half inch sensor might have had enough depth of field. Certainly an APS-C size sensor would not in this situation.

2) the reason this image doesn't have enough depth of field is that it is a close up. The area photographed is about 12 inches across, 18 high, the camera two feet away from the furthest object, six inches from the nearest. There is no f stop which will encompass enough depth of field to handle this kind of range, even allowing for blurring the stump in the bottom left. Check out depth of field tables on the net - you will be horrified at how little depth of field there is with subjects a few feet from the camera.

3) my own testing shows me that f16 is the smallest practical f stop for my camera. Beyond that, the sharp bit get fuzzier and there isn't sufficient gain in depth of field to justify this loss (diffraction).

4) even f 11 is sharper than f 16, so when blending, that's the f stop I use.

Why Helicon Focus instead of Photoshop - simple, it does a better job. Helicon has been doing this kind of blending for about 7 years, Photoshop only the last two versions (ie. about two years). Helicon's whole raison d'etre is blending, Photoshop made this one of many add-ons.

Are there limitations? Yes. Two problems occur and both happened here. First, as you change focus, the image size changes. In normal simple design lenses, as you focus further away, you include more (as if you were zooming out or moving away). Oddly, with my 24-105, the exact opposite happens, as I focus further, the image gets larger, ie it crops. So, if I frame perfectly on the near focus, it crops too tight at the far focus. The second and more serious problem is that with wide angle lenses especially, the software has trouble blending the edges of the image and you start to get double or even tripple exposures along the outside of the image. As this only affects about 10% of the image, cropping takes care of it - if you have room to crop 10%. I don't see problems with my 70-200, so in general I'm talking < 70 mm. focal length.

Other than that it works well. My preference is not to do a lot of sharpening on the image before blending - amount 25 in camera raw, considerably less than I'd use on a single image. I do not use any clarity enhancement (increased local contrast) as this tends to be exaggerated in the blending process.

Friday, May 13, 2011

Stanley Park


just back from a visit to Vancouver, to see our daughter and take a break. Found this partly burned stump on the beach at Stanley Park. Blended focus with Helicon Focus, a little bit of Akvis Enhancer to the centre only and otherwise pretty straight. Canon 5DII.

Monday, May 02, 2011

Travel Tripod

When I was in Victoria last fall, I couldn't find the ideal tripod for travel purposes, and ended up picking up an inexpensive Slik travel tripod, complete with built in ball head and mini-quick release plates. It was adequate and I got some lovely shots thanks to that tripod. The head though was the problem, especially for vertical shots. I normally use an L bracket from Really Right Stuff for my 5D2, so what I've done is order the smallest lever release head from the same company and will place that on this super light tripod. It's aluminum but reasonably sturdy and tall enough for travel purposes.

The big thing with a travel pod is it's nice if it can go on your backpack, which theoretically huge tripods can do, but in practice don't very well. Also, it needs to fit inside luggage when flying, and there are times a tripod that doesn't tie up both hands to carry is very nice.

Some might wonder 'why even bother with a tripod', especially with modern cameras great high ISO Imaging. For me the reasons are:

1) to be able to stop down for max. depth of field
2) shoot under marginal light - often more interesting light
3) to make blended images for incredible depth of field using Helicon Focus
4) blended exposures for HDR without the worry of misalignment of images.

These justify lugging a tripod, and if it can be a small light one without too much compromise, well all the better.

Let you know how the new combo works when I return.

George