Saturday, October 25, 2008

Quarry


Back out at Graymont yesterday and took them prints from the first venture two weeks ago. They suggested I might want to see the quarry and quickly I was driven over to it by Wayne and taken to the top of the working (hundreds of feet higher and a quarter mile along) and given a as much time as I wanted to photograph. It was one of those dial-a-light days with clouds alternating with sun. The only thing I couldn't do was easily stitch since the light was changing rapidly in the strong wind but I could literally decide did I want the light on the foreground or background or middle, or some combination and with a modest wait get what I wanted.

I finished back at the plant and some rail cars were parked for loading, the ground and the tankside covered in limestone dust.

Friday, October 24, 2008

Aachen Dom


Last night I decided to go back through the images I made during our trip to Germany and Prague. I had thought I'd pretty much mined the files for useable images but decided to be a bit less critical and see what I could do with what I'd taken - after all - I'd gone to the trouble to take the images in the first place - so what if the thumbnail didn't look useable.

In this particular shot, I was trying to capture the sense of fine detail - layers upon layers of it which the builders had created hundreds of years ago. It's hard to capture the ousides of cathedrals - they tend to be tightly surrounded by other buildings and a shot of the whole thing looks more illustrative than artistic and besides the whole is what the architect designed - if I want to bring something to the image I need to use light, shadow and composition to bring a fresh point of view if possible.

From a practical point of view, many of the angles are spoiled by awkward composition, or a bright bit of sky showing through or poor lighting and so on. The whole business of perspective with the building falling backwards as you point the camera upwards is problematic. It seems to work inside when there is no edge to the building and the receding lines show more of the ceilings but ouside it's a bit more difficult.

I elected to correct rotation and vertical perspective (and if need be barrel/pincushion) via filter/distort/lens correction in Photoshop. I liked what I saw. Many cathedrals suffer from millenia of soot and are almost black - Cologne was disappointing in that way - but they'd been working on the Aachen cathedral and sig. parts of it showed very nicely. This particular view avoided much of the black stone seen elsewhere.

I like the gradual ranking upwards and to the right of the spindles tops while the background building lines slope down to the right. These opposing lines often work well together and are to be sought.

There is a glow to the light stone to the right of the window and some judicious lightening of some of the other stone results in a richly toned yet balanced image.

I particularly like the lines of the corner stones in the top right, 1/3 from the bottom on the left and at the bottom 2/3 of the way to the right - they feed off of each other.

You might well ask how much of this I saw squinting through the viewfinder and the answer is not much - I simply saw a sense of "rightness" about the image and much of what I have explained above has been discovered after the fact. You might think that this is a bit strange and perhaps has more to do with luck than skill but if that's the case, I'm awfully damned lucky.

Let me illustrate. You see someone across the room who is really attractive. Lets simplify by saying you only see their face. Now stop and think about this - did you analyse the shape of the nose, carefully consider the cheek bones, check out the profile - of course not, you simply looked and found the whole appealing. It's quite possible that in fact if you break down the face, the parts themselves are unremarkable, it's the whole package that somehow works together in a way that appeals to YOU. You know damn well that others might well be admiring someone else in the room, that you might be the only person there who thinks this person's face is wonderful. With one glance at the face and no analysis, you might well already have a sense of this is someone you want to take to bed, or introduce to your mother or simply to get to know.

Going back to photographing and simply seeing a composition that "looks right", the analogies are pretty close. Not only do you see something appealing, you may well infer some feelings about it in the same way you inferred the personality of the face you saw across the room. That feeling may be of fragility, delicacy, endurance, strength, magnificence, reverence, or any number of inferences. All of this is entirely personal and that is what you bring to the image, even though you are photographing the creation of someone else. When others look at your images, they see your viewpoint. Either they are going to find it interesting or not - you can't control that and to some degree it doesn't really matter if you enjoy the images. Odds are though, that if you get the technical issues behind you and if you learn to effectively present your viewpoint, some others will appreciate it and you will acquire an audience. Whether they throw money at your feet or just kiss them is a whole other matter.

In the end, it's still just a picture of a building but I do think it goes beyond the ordinary postcard.

Saturday, October 18, 2008

Bow River and Rockies Edited


Do remember to click on the image to see it at a half decent size.

Friday, October 17, 2008

Editing Images 1


In the sequence above you first see the unedited colour image straight from stitching. Next is the result of a black and white conversion with the default settings in the Photoshop BW conversion adjustment layer.

Next is the result of a major lightening of the yellow at the same time as doing a significant darkening of the blue. While this is somewhat akin to shooting the original with an orange filter, it's not quite the same, and of course is infinitely adjustable via the sliders - who'd go back to film?

The last image is the final edit of a few days ago that I previously showed you - in which the mountains have been brought out somewhat (though not enough according to Chuck and he might well be right), darkening of the lower right corner and of the left side, and not quite so much lightening of the yellow - I kinda like the even lighter yellow of the "filtered" adjustment shown above.

Note how wishy washy the bluffs on the right are after the filtered BW conversion. Much improved after a few extra masked curves darkened them more and more.

Just to see if Andy (note, I'd earlier mistakenly put Chuck down for the suggestion on the mountains) might be right, here's a crop of the mountain range before and after a quicky contrast adjustment via a masked curves layer.


Looks like Andy's right - significant improvement - I'd been afraid to push things this far but hey, I like it.

This brings up the point that images are always a work in progress - when requested to make a print after a few months, I often make further adjustments and sometimes go back to an earlier save so I can redo the further steps. I don't always prefer the new version, but sometimes I really do.

Wednesday, October 15, 2008

Rich Tones In Black And White

Quite often I'm asked how I manage to get the rich tonality in my black and white images and photographers indicate this is an area they struggle with. Without going into an entire workshop on black and white workflow which may not in fact answer the question, here are some points to consider if your images look either flat or in fact harsh.

1) choose your lighting carefully. While harsh lighting can be to some degree compensated for with HDR techniques, I still find it's a lot better to photograph just before sunrise or just after, or to catch the subject just before the sun pops out from behind a cloud.

2) It's hard to get lovely tones in an image if in fact it's full of small details which alternate dark to light - eg. branches against the sky. Other subjects that have fine patterns of dark and white are also difficult. Ideal are relatively smooth objects which have nice gradations from dark to light (or to which you can add the gradations in the editing). Bottom line, some things photograph better than others.

3) Even well known photographers continue to claim they can manage without doing a lot of editing in Photoshop. While Lightroom 2 does have some basic local editing tools, it's a bit like building an entire house with a single hammer and saw - it's possible, just not convenient, efficient, or most effective. I spend hours working on each image in Photoshop to balance the tonalities and to achieve those subtle highlights and shadows. Perhaps you are trying to do it the "easy" way and shortchanging your images.

4) I think a lot of people tend to think of image editing as a "correcting" process - ie. fixing the deficiencies in the image. That's good enough for novices but that's like telling a painter he can't use his imagination, no interpretation, brush strokes or choice of colours - painters won't accept that and I would suggest that if you are serious about the fine print, you shouldn't either. Perhaps the single most important reason that people comment on the tonality of my prints is how I go beyond accurate to creative in my print adjustments. This can start with my choice of colour settings in the black and white adjustment layer in Photoshop CS3 and extends to the creative use of the curves adjustment layers, used of course with masking to control both where the effects are applied and the degree to which they apply.

In the next week or so I will show you some examples of the straight recorded file as it comes out of Camera Raw and what the final image looks like so you can get a better idea of what I'm talking about.

Tuesday, October 14, 2008

Bow River And Rocky Mountains


We were on the way to Jura Canyon and my friend Lawrence wanted to show me an outlook on the Stoney reserve with public access. The view was wonderful, the light nice, if not perfect. In colour the image lacked power but in black and white and careful handling of contrast the result is pleasing. - 6 images stitched with the 1Ds2, 70 mm. with the 70-200 mm. lens, hand on camera even though using tripod because of a goodly breeze. I took the lens hood off since it increased vibrations as it caught the wind.

Monday, October 13, 2008

Jura Canyon Again


It can be challenging revisiting a site, especially a site which had some pretty obvious views such as this narrow twisted canyon.

I made an effort to look for alternative views. Previously I'd centred the canyon opening and decided this time to heavily bias the left hand side. I had doubts about adequate depth of field but as I was stitching, I didn't want to both stitch and blend for focus. In reality the depth proved ok at f16 and 17 mm., mind you I have noticed that this lens (17-40) tends to have a curved plane of focus, that is the edges focus nearer than the centre so it actually worked to my advantage.

Friday, October 10, 2008

Graymont Lime Plant


This plant crushes limestone then cooks out the CO2, leaving corrosive Calcium Oxide. It's then hydrated to reduce corrosiveness and then the final product used largely in mining (especially uranium) and in the oil industry. Lesser uses include whitening paper and making the Hydrocal that model railroaders use for tough as rock scenery.

Much of the plant is covered in white limestone powder and I wanted to emphasize the whiteness.

I hope to go back and spend more time photographing the plant. The staff were very supportive - in fact Michael Schultz had been there three weeks ago - odd really, I'd not heard of him but my friend Lawrence Christmas (known for his images of Alberta miners and the book made from same) had mentioned his name last weekend. I'll be interested to see how Michael interprets the plant.

Monday, October 06, 2008

Saturday, October 04, 2008

Thursday, October 02, 2008

Photographing The Photographers


here's an idea for a project, hardly original but I think with a lot of potential - especially if you are photographing the happy snapper as opposed to the posing artist.

This happens to be a sculpture just below Cologne Cathedral and right next to the railway station.

Prague


Sadly I don't have vast experience of the most beautiful cities in the world, but none the less Prague was absolutely wonderful - with literally miles of preserved buildings and narrow alleyways, attractive buildings, cobblestone streets, the river and the hills. We were only there for three days and have already promised ourselves to come back to Prague at the first opportunity.

Photokina

Just back from our trip and thought I'd jot a few notes about experiencing Photokina. Much as it's a big circus - it's a well run one. 10 buildings, multiple connections, lots of walking, goodly sized isles, too bad about the smokers lined up along the sides and at the doors.


I enjoyed looking at hundreds of exhibit images from historical to student work, some of it excellent. There was a display of 1930's movie theatre photographs, made on 8X10 and printed digitally on Epson Traditional - they looked wonderful though I discussed the display with the owner of the studio which had the negatives and he still felt that an 8X10 contact print was dramatically better than een these lovely scanned and inkjet printed images. I must check into this paper now that I'm home.

Didn't bother getting near the Canon 5Dii display and what would have been the point in touching it - not exactly a religious experience. I did on the other hand have a look at the Panasonic G1 since I feel that electronic viewfinders are the future and mirrors bouncing is history. I was very impressed - nothing like your typical didicam EVF - it was bright (brighter than real life which didn't hurt shooting indoors, focused confidently and fairly fast, and panned beautifully (which previous EVF's never did). This is the future, people! As displayed the camera was still fairly bulky and I can't see anyone rushing off to replace their DSLR but see no reason why small lenses and a slim body can't be made.

Leica had a nice wooden S2 on display - wonder if it comes in light oak?

Thursday, September 25, 2008

Guess Where I Am


I'm at Photokina in Cologne, soon to be on my way to Prague to photograph for a few days. The trip was complements of my publisher and it has been interesting meeting the various authors, including some who have 30 or more years experience teaching photography at university level - eg. Harald Mante, who is a photographer of incredible sense of colour and composition.

Not much chance for serious photography but the image above is a hand held ei. 800 image from the Aachen Cathedral - home to the throne of Charlemaigne - yes, that one!

By the way, it's really dark in there and you can't see this much detail by the naked eye.

Sunday, September 14, 2008

Art In Photography

A great deal of fun can be had, if you are inclined that way; in debating art and photography, art in photography, art vs. photography, art isn't photography (or more properly photography ain't art) and so on. The problem with such discussions (which often generate heated and passionate debate) is that they really don't serve any useful purpose than to entertain, said entertainment mostly supplied to those doing the debating, not the poor reader.

So the question today is - is there any role at all for discussing photography as art that can actually make a meaningful difference to the individual photographer? I think it can - I think that contemplating art in photography can make our images stronger and can increase the chance that images thereafter are more likely to have meaning for those viewing.

Although in my blog I have tended to write about the creative or artistic side of photography, seeing and composing and such, it could well be argued that these topics remain the purview of craft rather than art. That being the case, what can or should be said about the art in photography?

Without getting into a (meaningless) debate about what is art, it might be possible to discuss how one experiences art in general and then apply that to photography and usefully discuss ideas for making images with better artistic elements.

Let's take an imaginary trip to a painting gallery. There are some two dozen landscape paintings displayed, by a number of local artists. Prices are actually affordable so it's not inconceivable that if something really caught your attention, you could actually consider purchasing it for that spot over the sofa. There is no consistency in style (after all it's a group show of "landscapes", technique and interpretation up to the painter.

We make a quick tour around, suspecting as we do that local talent may be lacking and our expectations aren't terribly high. Still, you never know, and the greats were once unknown and so with at least the hope of seeing something interesting, we survey the works.

There are several pretty scenes which would not disgrace our living room, some that are just plain odd and a few which don't seem to display much skill, in colour or composition or whatever.

A couple of the images are just plain disturbing, and one image reminds you of some of your best hikes - odd because what it reminds you of is the smell of rotting leaves in the fall - almost like tea, and the sharpness of the cool yet sunny fall air. You can almost hear the rustle of leaves in the trees. Odd, because the image is semi abstract and clearly doesn't show a hell of a lot - so how could the artist possibly have put all that into his painting. Perhaps he didn't even know he'd done so. Maybe someone else seeing the painting gets an entirely different feeling from it.

It so happens that this is opening night and while most people are gathered round the wine and munchies, talking to each other, the artists are standing round the walls, just waiting for some interested person to talk to them. You find the painter of this semi abstract image apparently representing fall and start a conversation.

Rather than offer a leading question like "how did you get the rustle of the leaves into the painting", you ask the more open ended question of "what did you want me to see in this painting?".

Unlike some artists who have been "got to" by gallery owners and been taught to to talk "artspeak", this fellow is rather naive and gives quite straight forward answers. Turns out he didn't have an agenda. He feels interpretation is entirely up to the viewer and he can tell you that this evening he has already had several interpretations offered, each incompatible with all the others, and none having the least to do with the thoughts of the painter at the time.

You want more than this so and you press the artist to explain why he made this particular painting. He hesitantly explains that he was sitting on the toilet, looking out through the frosted bathroom window at leaves of a maple actually brushing up against the window, shifting somewhat in an apparent breeze. Obviously he has sat here on many occasions, but something makes him pay attention. It might be the light or the particular variation of fall colours (though they hadn't changed much in the last few days and only on that particular day had the urge struck to make a painting.

He suggests it might just be his mood on the day, a little wistful, a few days after his girl friend has gone on a trip to Europe. He was feeling restless and empty. Did he consciously plan to paint that - hell no, he'd only just thought of it when you asked the question, and the explanation wasn't likely any more accurate than the suggested interpretations offered by the other gallery goers.

You still aren't satisfied - there must have been a reason to not only pick up a brush but to select those colours, paint them in that particular way, with the composition chosen and painted in the style selected.

The artist stumbles on this, and finally, recognizing the failure of his answer, admits that "it just seemed right".

It's clear that there is no great existential "truth" in this image for the painter, and even learning of his frame of mind at the time doesn't really explain how you came to interpret the image the way you did, and it occurs to you that perhaps had your mood been different, you might have interpreted the image in an entirely different way.

You leave the gallery with some idea of the creative process and wonder how you can apply what you have learned in your own photography.

Lessons learned:

1) It isn't essential for a work of art to have a message, only that it be capable of interpretations, the latter being entirely personal to the viewer.

2) There needs to be a reason to take the picture, and thoughts of "it will sell well" aren't good enough. It has to be a reason that relates to the artist. In the case of the photographer, it probably isn't necessary to understand why, just enough that you thought something needed photographing, that it intrigued you in some way you aren't even aware of, or perhaps even the feeling of "gee, I can do something with that".

3) We have no trouble ascribing the term "artist" to a painter, but similar thoughts and drives and needs seem to happen to photographers, so why shouldn't we apply the term to photographers?

If we are willing to ascribe the term artist to at least some photographers, then to whom do we apply the term? Who clearly does or doesn't qualify and now does one decide? Does it matter if the photographer was on contract and being paid to produce the work? Well, most certainly almost all of the famous artists from Michelangelo to Rembrandt were most certainly on commission. Many modern artists have commissions from government agencies to work on a project, just as Edward Weston and Ansel Adams had Guggenheim Fellowships to explore projects. It's beginning to look as if there isn't a lot of difference between painters and photographers after all. Maybe photographers are artists after all, and perhaps even hobbyist photographers who see something interesting and photograph it and edit it are artists too, even if not terribly experienced, or talented ones. Just maybe there's a little bit of artist in all of us and we should stop worrying about whether we are being artful or not.

A lot can be learned from listening to great photographers speak about the motivations for their work. Sure a few, like Caponigro, couch their work in "artspeak" but the vast majority do not and their motivations and pathways seem not a lot different from ours.

I can highly recommend Edward Weston's Daybooks as useful reading to understand the mind of a great photographer. Attending workshops and conferences where you can be exposed to several great photographers can be helpful.

If nothing else, you are likely to learn that great photographers are human too, that their thought processes are typically similar to ours when out photographing - it's just that they have a better eye for the interesting, have more skill in composing and editing an image and perhaps most of all, are better at not bullshitting themselves into believing an image is "good enough" when your heart says no.

It is fascinating to look at proof sheets of the greats - that their proofs really don't look all that different from ours, except we didn't make that one image on the proof that really stands out compared to the rest. They knew they "hadn't got it yet" and kept striving till they did "get it" where we quit without perhaps even knowing that we could have gone further. They had the tools (mentally that is) and we didn't - therein lies the difference between the great and the good.

The difference between good and great isn't one of kind, but of degree, of effort, experience, skill, determination, and perhaps a recognition of a journey completed - "ahah, that's what I wanted".

Wednesday, September 10, 2008

On Photographing The Beautiful

Luminous Landscape has an article I wrote on the problems of photographing things that are already spectacular, and how one might deal with this problem. In the forum discussion there is an interesting thread in the site section at the top following up on the article that once you get past the nice things said starts to get interesting.

Monday, September 08, 2008

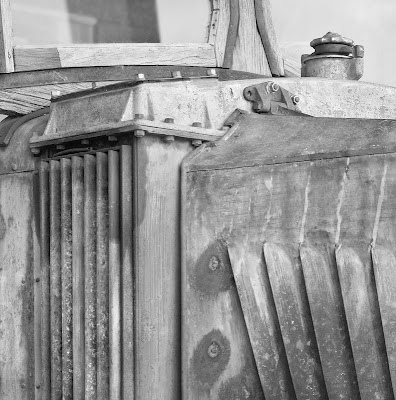
Truck


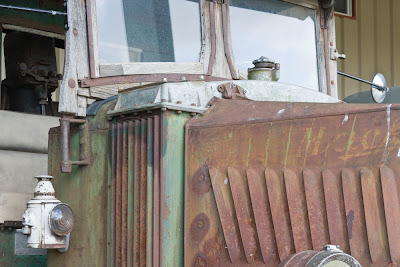
To make the image above, I started with the image below. I knew at the time that I'd be cropping either end. Perhaps I should have stitched a more tightly cropped image so nothing would be thrown away but fortunately with 16 mp, I can afford to do some cropping.


In the end, the headlight was problematic so I took a little off the bottom, and I ended up with too much sky reflected in the upper right hand corner so cropped the top a little too. I consider this fine tuning and was glad to have the option to crop just exactly so. Had I framed it "perfectly" in the original file(s), then perhaps I might have regretted it later (see previous blog entry for mistakes I make).

I worked on the colour image for a while, balancing the tonalities (too dark on the left bottom. I added some contrast and then added local contrast with Akvis Enhancer. I immediately backed up a step though and used the history brush on the enhanced step to apply the enhancement at a reduced degree (around 30%) as and where needed, including in a few areas stroking more than once so going beyond 30% as needed. Most of the image had no enhancement in the end, but other parts varied from 30-100% of the effect.

In the end I had a nice image, but the green and rust and pale blue of the sky clashed and I thought that the image might work better in black and white.

I darkened the blue slider to work on the sky reflected in the windshield, while using yellow and red sliders to increase tonality in the rust and green (in real life most green is far more yellow than green).

I liked what I saw but as often happens, needed even more contrast now that colour was not part of the information in the image. I added this selectively (not on the windshield) and used a couple more layers to lighten and darken as needed.

I didn't like the texture in the windshield on our left and so duplicated the flattened image and used gaussian blur of around 7 pixels to de-emphasize what was coming through the glass. A lot of blurring tends to look unnatural but this much carefully applied only to the windshield worked perfectly.

I decided that I still had a little bit too much almost white in that upper left corner so cropped even tighter than originally planned and feel the result is stronger.

That the end result is close to a square is just coincidence - it just worked out that way, but as you perhaps know from previous blogs, I am very fond of square images, so it certainly doesn't hurt.

Sunday, September 07, 2008

Success And Failure

After being out photographing yesterday and making a few prints today that I showed my wife and getting little enthusiasm for the results and realizing myself that though they worked out and were decent images, they certainly weren't great images, it occurred to me that it might be worth discussing the differences between a day in which really great images are produced, and one in which the images are ok but no more.

Regretfully, the most noticeable observation is that there isn't a lot of difference in the two days. I start out with equal enthusiasm and energy, my eye seems no more tuned on the great days than the others, my technique doesn't differ and the amount of effort I put in to working the locations doesn't vary.

Often but not always, I recognize a really great subject when I find it and know for the rest of the day that whatever else I find, it doesn't really matter because the day is a success already.

I felt that way when I photographed the rusty side of a boiler a couple of weeks ago and even though I have continued to refine my editing of the image since then, nothing has made me change my mind about the image.

For better or worse, I suspect that all one can do to make more of these kinds of images is to at least be prepared for them, to capture them properly and not screw up and offer ourselves the best possible negative or digital file we can.

Yesteday I was photographing with my friend Robin and he'd borrowed my 400 Tele-Fujinon for his 4X5. He found an image he was quite excited about, one of the old trucks, and was trying to capture the image with his 135 mm. lens (wide normal for a 4X5). I suggested trying the 400 on the grounds that he'd include a lot less background (ridged metal siding) if he could shoot from further away. Robin set up and determined his expusure which was for f22. Perhaps you don't use 4X5 but let me tell you that at f22 with a 400 mm. long lens on 4X5 you "ain't got no damn depth of field".
Robin has done this before, with his medium format equipment, finding out after the fact that his depth of field wasn't nearly enough to cover what he needed - I suspect that in the past he photographed things at infinity and I have been corrupting him with my work close up, but anyway, I suggested he stop all the way down to f64. Diffraction will limit the size of prints he can make, but I suspect that he will get a really good 8X10, which he wouldn't have at the wider aperture.

The other, harder and probably more important part of being ready for the great images is to not screw up the composition. There is nothing worse than getting home and looking at the proofs and realizing that you should have been a 1/4 inch to the left, that something sticks up from the background which in hind sight glares out saying careless. In a digital world, one can often shoot several attempts to ensure that "I got it", subject to wind and weather of course, but Robin had 10 sheets of film yesterday for a day's shooting - something he spent much of the day regretting, yet represents typical previous practice for him. Even with his limited amount of film, Robin tended to see something he liked and would then set up at that spot. I noted that in every case, Robin had his tripod (a rather short one) at full extension and that he didn't spend a lot of time working the scene, bending his knees or stretching to see if he really was in the best spot. If you do shoot large format film, even less can you afford to not work the scene.

If you truly fear that you might lose the shot - to changing weather or rotation of the sun, or the wind picking up - then go ahead and use a single sheet of film on that first setup, but rather than duplicating the image with a second piece of film as backup insurance, start working the area to be sure that you get the best possible image and use that second sheet for the "new and improved" setup. Perhaps the original will be the best, maybe you won't even get the chance for a second shot as the situation changes, but most of the time you will and some of the time, the second shot will be substantially better than the first.

Below is a list of screwups that even in the last few years have bitten me in the ass and prevented the recording of a great image. In days past it used to be exposure, but in a digital world there really is no excuse, and of course you can't have any darkroom accidents - every so often two sheets of film would stick together in the tank probably during aggitation - but that's history for me, for now, unless I succumb to the temptation to try out ultra large format with a 7X17. Anyway, on with the list:

1) depth of field - before I started shooting multiple images for blending in Helicon Focus, this was by far the most common problem. Depth of field scales on modern lenses are either useless or often just plain missing (no great loss). As I don't use the multiple image technique for the majority of my images, I still sometimes screw up.

2) cropping too tightly - I can blame the joys of looking through a relatively small viewfinder - and perhaps if my next camera has a 3 inch or bigger LCD I can be more exact, but even yesterday I shot an image in which I ended up cropping out the corner where two important lines met - not by much, but missing is missing. Sure it's important to use every pixel, but better you can't make quite as big an image but at least you captured all you intended. This issue depends somewhat on your viewfinder. As a lot of lower and medium level cameras have viewfinders which show less than 100% of the image, you may not even be aware of this problem. My camera viewfinder shows all, but can you really be sure it captured the last 1/4 inch in a scene that was perhaps 20 inches across - that's 1/80th of the image width in the viewfinder.

3) near to far alignment - again at the size of the view finder, can you be sure you aligned the two objects perfectly - perhaps you should use the playback zoom to check on the lcd that you did in fact get the alignment perfect.

4) the uncluttered background - it's not enough for you to think that telephone pole is hidden, you need to be sure, and did you remember to avoid the wires? It sounds silly, but in the excitement of a really good image, it's all too easy to screw up details like this.

5) Clipped highlights - if the light parts of the image are really important, it's not enough to assume that the recovery slider in Camera Raw is going to save your ass - make sure they are within range and if need be shoot a second exposure for the shadows.

6) flare. While I generally use lens hoods, the problem with zooms is that the hoods are of course designed for the widest focal length the zoom goes to, on a full frame camera (assuming it isn't a reduced frame only lens). If you go longer or you use an APS-C sensor sized camera, then assume the hood isn't going to be adequate. With really wide lenses, every speck of dust on the front surface is going to produce a diaphragm shaped flare in your image if there are bright spots either within your image or nearby - no matter how careful you are to use your hand or hat to block the sun from the front of the lens. Even sun on the side of the hoot creates problems if the shot you are recording is of something really in deep shade. A final brushing of that front element can reduce or eliminate hours of attempting to edit those flares in Photoshop - I speak from experience.

7) Vibration - in the excitement - did I really wait long enough after touching the camera for all vibration to settle, to then trigger the mirror release and wait again for a couple of seconds for vibration to settle. Some camera setups are more vibration prone - obviously long lenses for a start. But how about long exposures with IS turned on - IS isn't designed for 1 second exposures so turn it off. I found that even though my 70-200 f 4 zoom was small enough that it didn't have to use the lens bracket and I could mount the camera to the tripod, lens to the camera, in fact it stuck out enough that it really did magnify vibrations and using a lens mounting bracket has made a big difference. Besides, that's usually all I need for stitching with longer lenses as now I can rotate the camera around the lens. Sometimes a lens hood catched a cross wind and creates vibration. In windy conditions I sometimes hang onto the camera during exposure even though it's tripod mounted and I'm using a $1000 tripod. Yesterday, I noted that though Robin was using an older metal goodly sized Gitzo tripod, the ball head he was using was much too light for the purpose and considerable play and therefore vibration was set up between the top of the tripod and the camera base. Thou shalt not ever use rubber mats on tripod heads to protect your camera - either you want to save your camera as a collectors item, or you want to use it - you decide.

I dare say I make a hell of a lot more mistakes than that, but the above list consists of real problems I have and continue to face on a regular basis.

Do you even know what the problems are that you face - if you haven't done the detective work to figure out where your problems lie, then thinking about that might be your fist step to success.

More From Pioneer Acres


Saturday, September 06, 2008