Sunday, June 29, 2014

Atlas Coal Tipple


Nipped down to Drumheller yesterday, with plans to shoot the badlands but decided first to visit Atlas Coal Tipple, and ended up spending the rest of the day there. My Metabones Canon adapter failed (couldn't communicate or set the f stop). This was more than a little frustrating as it eliminated 3 of my 5 lenses, including my favourite 70-200, and close focusing (my extension tubes are Canon). This had been on the camera in Newfoundland when the previous A7r came off the tripod and fell six feet onto rocks.

The adapter looks fine but works only intermittently. I had fortunately decided at the last minute to take my A6000 kit with me and so used that for the rest of the day including these two images, both shot with the very small 55-210.

I occurs to me that I could have used it on the A7r but with the rear baffle still in place it only ups the pixels from aps-c size 15 mp to about 20 of the full 36 and you lose the quick focusing of the A6000 and 24 mp within the aps-c size, oh yeah, and IS too, though that didn't matter using the tripod.


this image was from the washhouse, 10-18 at 10 mm., 30 second exposure at f14, considerable work done to even out the exposure, increase local contrast and give the image depth.

Sunday, June 15, 2014

A7r For Professional Use - Not Quite

I've had a chance to use the A7r more extensively and in a  variety of situations. There are many things I like about it - the EVF, and tilting LCD (though why camera manufacturers continue to think that we don't shoot vertically is really mind boggling.

Some things I don't like about it and here's a partial list.

1) taking 3 seconds to turn on - just not professional
2) often, one is unable to magnify shot images  - the same happens with the A6000 - clearly a software bug - fortunately not affecting the final image.
3) the shutter button isn't definite enough - not like ones on Canon cameras for example, where there is a definite tactile difference between half press and full - here it's a guessing game.
4) even breathing on the shutter button will cancel magnify view, making manual focus a pain, and sometimes I'd swear I didn't do anything to cause it to drop out.
5) formatting cards is buried in menus and can't be put in "mymenu" like on a Canon camera, or done by double button pushing as per Nikon D800e (I actually prefer the Canon My Menu system - less scary, more definite than the Nikon way and oddly, faster too.

Now, don't get me wrong, there are far more things to like than not - for example, using tilt lenses is a breeze with focus peaking.

I didn't find camera shutter shake to be a huge flaw - but I was using the battery grip. Likewise battery life was not a problem since the battery grip holds to batteries, but otherwise, you'd likely find yourself changing batteries at critical moments just a few times too often for comfort.  I did find the shutter noise to be an issue during my recent trip to Newfoundland.

In hindsight I should have used my Nikon equipment for the trip, selling it after if I still wanted a change. I'd thought the light weight and small size of the A7r would be ideal - but too often it wasn't the right camera - for people, in the helicopter, for quick grab shots, and for small size (after all with the Canon 70-200 plus adapter plus L bracket on the adapter, this is not small kit).

Now that I'm back home and not photographing whales and birds and musicians, it may well prove itself close to ideal, or close enough.

Newfoundland Three


These images are from the old bunkers at Cape Spear, Newfoundland, about 25 minutes from St. John's. We had visited two weeks earlier and even in that short time, new graffiti had been added, complicating the photographing.  Both images were made with the 24 ts-e lens mounted on the A7r.

Even with careful viewfinder framing, I still needed to do some small Edit/Free Transform to get perspective correct for the print. This isn't a fault of the equipment, rather that tilt as little as one quarter of a degree is noticeable on a print, and not in a viewfinder of lcd, and not measurable with current leveling aids in digital cameras. I could have made colours and contrast pop in both images, but prefer the more pastel look shown here.

Saturday, June 14, 2014

Newfoundland Two


The first image is a recreation of the Viking houses at L'anse Aux Meadows. The second is an old fence on Fogo Island, the third a beach artifact at Woody Point, next to Gros Morne. The first was made with the A6000 and 55-210, the second with the A7r and 24 ts-e Canon lens shifted left and right and stitched, the third with the A6000 again, this time with the 10-18 IS hand held at 1/8 second.


The fourth image is the A7r on Fogo Island, 24 mm. ts-e, tilted for nice fore to aft focus, but I forgot to check depth of field left to right and the right edge raised rocks are out of the plane of focus.

Newfoundland One


We are just back from two weeks in and around Newfoundland. The first image is as our cruise ship Sea Adventurer (passengers 118) left St. Johns. This is the area referred to as "The Battery". The ship was late in leaving, held up by customs having arrived from winter duty in Antarctic.

The second image is from L'anse Aux Meadows - the Viking settlement at the northern tip of Newfoundland. Keep in mind that pack ice in the background was solid, the wind was howling and the temperature hovering around freezing point - sure can see why they left after 10 years but still some 500 years before Columbus. We learned they may have headed south to modern New Brunswick.

The third image is of Snorri - a repilca Viking boat, named for the son  of Eric The Red, who settled in Newfoundland, after being kicked out of both Iceland and then Greenland for multiple murders. Charming but tough bugger! In 2000 the boat was sailed from Greenland to Newfoundland to commemorate the 1000'th ann. of the original trip.

All three images were made with my new A6000 - I'd fallen in love with the viewfinder - so much better than the Nex-7, and at low ISO, smoother more detailed images. With my 10-18, 16-70 and 55-210 kit, it made a small portable package for travelling and ended up being used a lot more than my A7r. I was very pleased with the A6000. No, it doesn't focus as well as a good dSLR, but decent, definitely.

I didn't have my tripod for the interior shots of Snorri but simply held the camera against a post as best I could, and with the amazing image stabilization of the 10-18, was able to make the shot.

I never would have guessed that IS would matter in such an ettreme wide angle, but repeatedly on this trip it proved helpful.

On Newfoundland itself, it was wonderful and we can't wait to return. Wild, friendly, beautiful. The ads for Newfoundland are all true.

Friday, May 16, 2014

Zoo With 400 f 5.6 and Canon 70D

Well, lots been happening. I'm going on a cruise soon and birds are going to be significant, puffins, also whales - so I checked out the birding videos and websites and the consistent recommendation was a Canon crop sensor camera (usually the 7D) and the Canon 400 5.6 L lens, particularly for birds in flight - the point being that your shutter speed has to be high anyway.

I have now made the bold (? foolish) move to sell all my Nikon gear, for a variety of reasons I can go into but largely because of having the Sony A7r - but it did leave this one hole.

Here's from this morning's trip to the Calgary Zoo.


I actually want to go back and reshoot the owls with my A7r , 400 mm. not cropped, and with tripod so I can reduce the ISO. That said, ISO 6400 isn't bad on the 70D. "Grain" on a 13X19 print is visible  in the eyes and beaks, but probably less than Tri-X in the old days - we live in wonderful times.

Thursday, April 17, 2014

Spoon


Happened to notice the tarnish on this tea spoon, so parked it in the cupboard for later. I photographed it with the A7r, 90 mm. tse, tilted and with a 30 mm. extension tube. The whole thing vibrated in the wind, and I was pushing it with the 2 second self timer to settle that quickly and not be influenced by shutter shake but it seemed to work out fine - only the centre is in focus. I shot two images at different exposures and blended them manually to avoid the washout of highlights at the base of the spoon.

The background was blurred with a gaussian blur on a separate layer, then masked back, then I did the same again, only using lighten so only the lighter pixels would smear, and masked much of that from the centre of the image.

Monday, April 14, 2014

A7r Photographing People

I had an interesting opportunity on the weekend at the local model train show (where we help kids build cardboard train stations as well as give lectures on basic model railroading). There's lots of opportunity to photograph the fellows helping cute kids construct the stations. On Saturday I brought the A7r, 55 FE 1.8, and the 70-200 Canon L IS. Interestingly the latter worked better than the former, using manual focus to get eyelashes sharp. With the wider angle of the 55 and very poor autofocus.  I hadn`t expected greatness, but considering the indoor soccer centre was decently bright, was more than disappointed with the number of failures (about 3/4 of the images).

So the next day I came with my Nikon D800E and 70-200 f4 lens and autofocused without problem and nailed the eyelashes 3/4 of the time which I thought very reasonable. When it came time to actually edit the images, though, shooting at ISO 6400 (ok, maybe it was darker than I realized but kids move fast) and wide open or at most f5.6, image quality definitely suffered. There isn't a fix for this currently - just a fact of life. The problem was less one of ISO than depth of field.

Now, the real reason for this 'test' was to see how the A7r would handle indoors photographing artists and musicians (part of our holiday) and the bad news is, NOT WELL.

The A7r would be absolutely fine for formal portraits, less fine for casual people pictures and hopeless for photographing indoor soccer (or equivalent).

Interestingly, I also had a particular model mine I wanted to photograph on Sunday so brought my tripod for the D800e - and after a couple of weeks with the A7r, what a pain using the D800. The viewfinder was dim. I switched to live view and had to put up with the terrible image on the lcd, swimming aaround, even after I turned of IS, and of approximately 200K visual information, vs. the 2.4 meg of information in the Sony Viewfinder.

I'm going to love the A7r for my landscape and industrial work.

I'm going to be interested to see how the A6000 does when it gets properly tested as using the same lenses and at 24 MP, it might be all I really need for the weekend's work in which case I can get rid of the Nikon.

My casual impression (looking at images on screen at 100%) is that shutter shake on the A7r with the battery grip is not a significant issue, and the bulk of the battery grip still makes the camera smaller and lighter than the D800e without battery grip.

Once again I have to say I was impressed with the 10-18 on the A7r - would I recommend someone deliberately run out and buy one for the A7r - NO, but if you have one already, for sure - and I'm not going to carry a separate ultrawide.


Friday, April 11, 2014

A7r and 10-18

There's lots of talk on the net about the 10-18 covering all of the full frame sensor of the A7r - with examples showing distortion and poor resolution at the corners. I went out to the garden yesterday and made an image, at 16 mm., no vignetting but definite blurring along the far sides. I did some checking and cropping and bottom line is if one trims the image to square, resolution is superb to the corners, this on a 24 inch square print.inspected from 8 inches away.

My intention to carry a large and heavy ultrawide is definitely on hold for now. Too bad the A7r can't be cropped in camera to square - now that's a firmware update I'd pay for, and maybe 4X5 ratio with this lens.

The widest view combined with a reasonable number of pixels is a 2:3 crop of 22 megapixels at 12 mm.

Given the small size and extremely light weight of the 10-18 - it will make an ideal travel lens for me this summer when I go to Newfoundland.

The Canon 70-200 L IS lens works great on magnified manual focus, and the IS is great - very sharp pictures at 1/60 and 200 mm. - perhaps that battery grip is helping shutter shake as much as some people say - anyway - works for me.

I have the 55 FE 1.8 native lens, and now just need something between a cropped 12 which is probably about 15 mm. equivalent, and the 55.

The sensible thing is probably the native 35 f2.8 since I don't need another fast lens, and perhaps a 24. I might lug the 24 Tse, but it's quite a weight on the A7r.

Anyway, in the mean time I will have no hesitation to use the 10-18 on serious landscape work.

Sunday, April 06, 2014

Power Pole


After considerable debate and a lot more research, I decided to purchase the Sony A7r and 55 mm. lens and battery grip. I didn't yet have an L plate (or any plate) for the camera but I rested it on top of the tripod and held it lightly in place while making this image. I was inside the pole that was lying on the ground waiting for installation. The light at the other end is in fact simply reflection from the end I'd crawled into. I could walk stooped over it was so big.

I'll be commenting on the A7r experience in the next few weeks as I get used to it - things like how big a deal is shutter shake, does the battery grip solve that problem, what about the compressed raw files and how does the camera handle. Is autofocus fast enough, and for what, and what about other lenses on the camera?

I have a metabones Canon adapter for my Nex so will be using the few Canon lenses I hung onto - my 24tse, 90 tse and 70-200 f4 L IS.

I then have to make the decision on what to do with the Nikon equipment, some of which at least will need to be sold to pay off the A7r.

Impressions so far:

1) the camera is a delight to use.
2) I wish the image magnify button was somewhere not next to my eye and glasses.
3) images at 100% look crunchy - def. very artificial compared to the images with the D800e.
4) Live view is infinitely better than on the Nikon, probably the single biggest reason for going ahead with the purchase.


Stay tuned for more objective assessments.

Saturday, March 22, 2014

Pathway Ice


Walked past this as I was looking for a train photo, but while waiting for the train, started to look around and found this rather inconspicuous scene. Shot with Nex-7 and 55-210 hand held.


Saturday, March 15, 2014

Sunday, March 09, 2014

High Key Images And Snow and Ice In Particular

Mike wrote:

I really enjoy your high key B+W images, but have had no luck at creating my own. Would you be willing to share your technique or direct me to other resources where I can learn how??

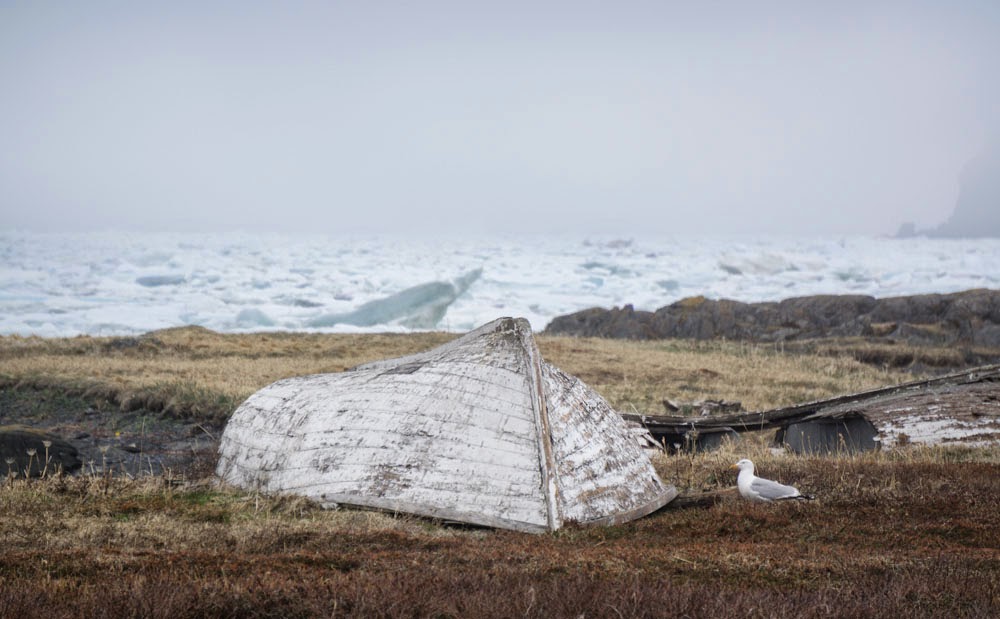
I do have some techniques to increase the chance of good high key images, which often involve pictures of ice and snow.

Here's the steps I take:

1) Use the highlight control to increase detail in the white and light areas by moving it to the left in Lightroom or Camera Raw

 without the highlight slider moved to the left.


and with the highlight slider moved left, and the shadows slider moved a little right.

The next step is to do normal editing on the image, adjusting tones as needed. In this particular case, there isn't anything I want to do to the image before applying Akvis Enhancer that opens shadows and increases separation in the highlights. The Clarity slider dose the same thing though more to midtones than either highlights or shadows, so most often if I think I'm going to need Akvis Enhancer, I will not use any clarity at all.


and here we have Enhancer applied then toned down to 72% of effect - just because I usually find the full effect a bit too much, and with any further editing the risk is to look cartoonish.

The next step is to make sure that the image pushes the boundaries of white. I do this by adding a threshold layer, set to 250. What this does is to turn to black all pixels darker than 250 on the 0-255 scale, while leaving the rest as is.

In order to see the underlying image - and know where to work - I then turn down the opacity of this threshold layer so the image is peeking through, and we have:

 there are literally only a few pixels out of the entire image that even approach pure white - definitely going to produce a muddy image when printed, even though because of the brightness, it looks fine on screen.

The next step is to add a layer under the Threshold Layer, a Curves Adjustment Layer, in which I move the top right point in the curve to the left (ie.  producing a steeper straight line). This has the effect of driving light pixels closer to white, and I don't mind going a bit past that point because I'll mask this layer after. How far to the left? To taste, experience, and not driving most of the ice over the top. Say, about this much:


The next step is to add a white mask to this Curves Adjustment Layer so I can reduce the intensity of the layer as and where I want. I then paint into the white mask with black, opacity somewhere between 10-30% opacity on the 'black paint'. To know how to do this, I use a combination of with the Threshold layer and without, so I can see how effectively I control those over the top whites (with the Threshold layer visible) and how realistic the tonalities are (with the Threshold Layer invisible (uncheck the box to the left of the layer).

And we have the above after turning off the threshold. Now we have the brightness we want, though the detail and tonality of the ice is a little lacking. I now use a Curves Adjustment layer, a sagging curve with the biggest change in the highlights to increase the contrast in the highlights further. I did this locally first, then decided I hadn't done enough and created a second sagging curve of the same shape, but applied globally and then used the opacity slider for the layer to adjust to taste and we have:

You might be tempted to think that all we've done is to go back to the step before I added the threshold layer, but not quite - there is a lot more detail and texture in the ice now - but I do agree, it's back to being too dark.

So, one more step. I flatten the image and duplicate it in a second image layer (you drag the image from the image layer down to the second icon from the right (the create new layer icon) and voila, two image layers - one I can mess with all I want, because I've a virgin copy underneeth.

So, what am I going to do with this extra image layer - I'm going to use the dodge highlights tool (Dodge tool, with Highlights selected in the submenu above the image window, and set to 5% opacity). With this, I'm going to bring back the glow to the highlights, and yes, I'm going to use that threshold layer again (I have it as an action - threshold at 250, opacity on the layer to 85%).

Again I'm turning on the Threshold layer to make sure I didn't drive large areas to pure white, while turning it off to check for overall tonality. Once you have a few small areas that barely get to 250, it's pretty easy to adjust the rest of the image to match.


At this point, it's worth taking a break and coming back the next day, as it's easy to carry this too far. Notice I did a bit of dodge highlights on the rock and it looks as if a little stray sunlight made it in, the rocks are now significantly more three dimensional. Think of dodge highlights as liquid sunshine, to be applied to taste. The dodging brush is applied quite uneavenly.

this rather bizarre image is the result of the dodging highlights, then applying difference blend mode to the dodged layer relative to the virgin layer below, and the result lightened a bit so you could see it better. This is just to show you the parts of the image that were dodged - black indicates no dodging was done. Note the different intensities of dodging, and also where I dodged, following the flow or edges or highlights of the ice, while leaving the recessed parts of the ice alone - further enhancing the three dimensional effect. Again you can see the rather intense amount of dodging done to the background rock to get the sunlight effect. Sometimes dodging the rock can result in splotchy lighter areas so I now tone that back (by masking out the dodged layer in those splotchy areas, and I have the final result for tonight. I took about an hour to make all these adjustments as well as write the article as well as save the various generations. Normally I'd spend twice that long just doing the editing - but as you can see, even rushed and a bit carelessly, the result is still effective.

As usual, don't forget to click on the blog images to see them larger so you can get a better idea of texture.  This technique can be taken way too far, and I have learned over time not to get too carried away (most of the time) and still sometimes have to start over.


So Mike, are you sorry you asked? What do people think - too far, over the top, or worth while?


Seebe Dam


Eric suggested an excursion, and he, Erna, Ken and I headed out to the Seebe dam, or to be more accurate, to below the dam. I'd not been there despite driving past it many times. It was extremely windy and tripods blew over and I did most of the day hand holding my Nex-7 and whatever lens. In this case, the 55-210, f11, and a 5 image stitch.

Saturday, February 15, 2014

Daffodils


.


Shot with the 200 micro nikor, largely backlit in my kitchen.

Sunday, February 02, 2014

Buttercup Redux


This and the previous image have one thing in common, both have minus clarity in Adobe Camera Raw. Mind you, the amount is small, the effect subtle, but also important to the image. What's the feeling about using this in this way and in this amount - cheating? Tacky? Fine?

Is it as legitimate to turn clarity to a minus as it is to ramp it up and what does this say about increasing clarity - is that just as inappropriate or perfectly ok? What if the degree of minus clarity was taken to an obvious degree - what then?

And Now For Something Completely Different


Saturday, February 01, 2014

Oven Door


Above is the first version - actually closer to the true colour of our very dirty oven door, but various edits later and a decision that the image was too warm and I have the result below. To produce the second result, I took the edited version of the above and saved as a TIFF, then brought it into Camera Raw and adjusted the colour temperature to cool it off a bit.  I suspect that ideal will be somewhere between and it's clearly a work in progress. The journey has not finished.

and the last is a reshoot later in the day with less light from the front of the glass.


Friday, January 31, 2014

Another Celestial Image


I can't decide if this looks more like outer space through the Hubble or someone's ultrasound test result.  Either way, I like it.

Sunday, January 26, 2014

Sony Nex 55-210 Lens

It's only been one day, and most of the images were shot yesterday in shade so the auto ISO was 1000+ for most of the images, but a few were in partial sun, ISO 250, f 11 and I have just made a 16X24 print that looks excellent. I can read print that is 1/32 inch tall on the print - albeit with my magnifying glasses because I can't see that close without. Not bad for a $350 lens on a small camera, hand held. It's everything I need an  a walk around lens. I did debate getting the 18-200 which is reportedly about the same quality - but light weight and the fact that I have the 18-70 already covered, and saving 2/3 of the price won over. So, my three lens, light weight kit consists of the 10-18, 17-60, and 55-210 lenses, 15-315 mm. in 35 mm. terms.

I'll get round to doing some more formal testing on the lens (ie. wide open and iso 100, but all I needed to know was if it would serve adequately, and it's done more than that.


Remember to click on the image to see it at 100%

Saturday, January 25, 2014

Wandering Around Downtown


I purchased the 55-210 lens for my Nex and spent the next two hours wandering aaround downtown.

Wednesday, January 22, 2014

Smugmug

Several years ago I left smugmug. The interface was not attractive, you couldn't use the keyboard to go through images, and integrating other parts of my website were less than easy to downright difficultt.

Enter 2014 and the New Smugmug resolves at least some of those problems, and makes uploading and moving images infinitely easier than the commercial website I currently use.

So, if you want to see all of my images (at least the colour ones so far), go to Smugmug

Whether I'll switch over the entire website remains to be seen - some stuff (like pdf files) has to remain on my current server and most of the links aren't yet functional from smugmug.

You can't order prints as at the moment none of the full size files is uploaded, but I'm considering doing that as a separate section of the smugmug site. That being the case I'm going to test several prints ordered from smugmug to check on quality before  I let anyone order directly from them.

Ebook Progress

After a lot of hours spent watching InDesign how to videos, and struggling to get an epub to look right on the computer monitor I actually made a lot of progress only to find that what adobe showed as the output didn't look anything like what appeared on my ipads, either the old one or the retina screen version. Seems that epubs are really for text type books, not image intensive publications.

Someone sugg. checking with David DuChemin and Craft and Vision ebooks. Turns out they are all pdf's. I checked with a few other sources - pdf's - beginning to tell me something here.

So, I'm not abandoning my intentions to produce an ebook, but I will be doing it in PDF format. Downside is that you need a different version for each screen, but that wasn't all that diff. from epub anyway so not much of a loss, and I can show images properly on screen.


I have the latest edit back from Blurb for my 12X12 book - actually very nice, but at $137 it's incredibly expensive. I'm going to explore more reasonable options.

Anyway, look for a pdf format ebook suitable for the ipad in the not distant future.

Tuesday, January 14, 2014

Why Do We Fuss About Selling Our Images?

The obvious answer to the above question is  that a) we need the money, or b) we need it to buy more photographic gear, perhaps gear our spouses wouldn't approve of otherwise.

Perhaps the more important reason is that is that someone paying for our work is a very clear message - our work is worth while (well, unless it's mum).

So, if the hassles of setting up e-commerce or accepting credit card payments and dealing with unhappy customers and failed transactions seems a lot of bother (it is), then maybe it's time to think of giving your work away.

Think about it.

What if you placed your work into a pdf, large enough images to really enjoy on a typical modern monitor, say something around 1200 pixels wide, 900 high, and either use your own website servers or a service to maintain this pdf file.

You then let everyone know that your work (perhaps a sig. but not complete part of your work) is now available, for free, to download.  You set it up so people do have to give you their email address, and make it plain what you will and won't do with that address.

You now have a way to track downloads and thus interest in your work, which was after all what you really were looking for when you thought to charge for it. True, people could share the downloaded pdf file, and you can't track that but that's ok - no saying where the exposure might lead.

Now, to be blunt, I haven't tried this, but it's something I'm thinking of.

I did think of an ebook but it occurred to me that a book of pictures wouldn't offer anything that a website wouldn't so expecting people to pay for it seems rather silly. No, for people to find a book worth paying for they'd reasonably expect more, and that's a topic for another day.

In the mean time, I'm interested in your thoughts about this idea, pros and cons.

Sunday, January 12, 2014

Just To Get Out


No idea for a project but desperate to go out photographing none the less, I headed over to Ogden. I found a lovely rusty door - but though the colours were great, the overall form just didn't quite work. Likewise a rusting steel structure. I found some huge long dump trucks, with their beds raised, and their insides all rusty - but the light wasn't right and I was doubtful about the image anyway - not worth waiting for a cloud to pass.

I drove past ADM flour mill, that I have photographed many times, and there were thousands of ducks and geese feeding on spilled grain. I needed a background that wasn't distracting and the silos served. I tried stirring the ducks to fly but depth of field became a problem and so this one image with the ducks all near the silos worked best.

I might try this again though, a single duck flying against the background might just work.